Monday, February 25, 2013

The search for perfect hand-made ceramics

Perfect hand-made ceramics

...has been going on for some time. Until about 2 weeks ago I walk into Stilrummet to make a delivery and ask - where did THESE come from?? Wonderful, perfect, where do I find the maker, please, Marie, please?

Petra of Petras Lera has fulfilled her dream after moving to Sweden from Finland about 1,5 years ago. She is making the most beautiful hand-made ceramics one can possibly imagine. Working in same location with 7 other ceramists she is creating these beauties step by step, piece by piece.

She starts with a piece of clay in her hand. Looking at it, asking, what are you going to be? What's inside of you? She works the clay into plates, bowls and other accessories using vintage baskets and bowls as a mold.

She then picks one of the old, hand-made lace tablecloths of her grandmother Ingrid.  Presses the cloth gently into the wet clay to create a pattern. And carefully removes it to avoid any ripping of the old textile.

Perfect hand-made ceramics

After days of drying and all other necessary finishing steps, magnificent pieces of art are born. Every single one of them is unique. Hand-made with love by Petras Lera.

Perfect hand-made ceramics
***
Käsintehty keramiikka, keramiikkatyöt

Sunday, February 24, 2013

Cottonhut for Spring/Summer 2013


Cottonhut (cottonhut.se) story began at our summer house in 2003.  A log house, to be precise. Being here again, it felt right to share some thoughts, and post a few images of Cottonhut spring/summer 2013 collection.

In the old times in Finland, the main buildings of the farms were always  built of logs. The logs were cut from your own forest, taken to the mill, and then used for construction. When ready, very often  the house was insulated from outside with additional layer of wood, but inside the logs were visible.


The house was decorated with traditional, often self-made, wooden furniture and textiles. Rag rugs, chip baskets for storage, self-woven linen for the kitchen and bedroom. Hooks and lanterns from the local black-smith.  Bread and butter baskets from the local artisans.


As the agriculture way of life slowly faded away, were those, who still have the log-house to deocrate, forced to order the traditional items one by one from artisans becoming fewer and fewer, or purchase decoration items, which never really match the walls around them.

Cottonhut Collection was created to answer this demand.  We see our products used in a summer house by a lake, a mountain hut built of large logs, or a country home where the center is a large, all-purpose kitchen.

Traditional styles and materials. Simple, yet soft forms. With a modern touch. Carefully made by artisans, small businesses and certified producers around the world.


Wednesday, February 20, 2013

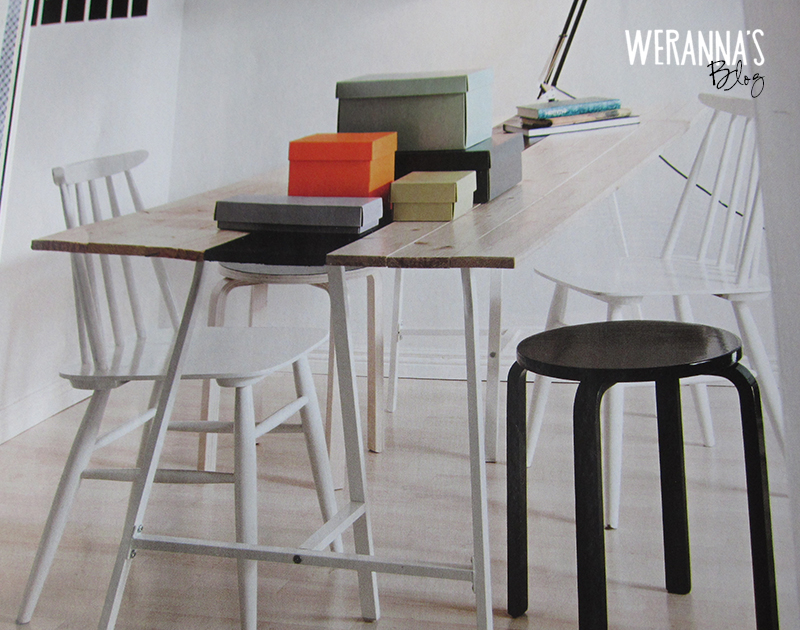
DIY table

DIY table
Those of you visiting Weranna's Warehouse frequently have become very familiar with Weranna's showroom table - I just simply love it! It was one of those days last summer when I was at my in-laws ranch, and saw a pile of old floor blanks in a shed and just seeing the pile made me go 'ahhh...'. 100-200 hundred-years-old blanks, with many layers of paint and glue (from wall-to-wall carpets used during the past decades) on top. Both wooden pegs and hand-made nails had been used during the many years (all treasures safe and sound, don't worry) to keep the floor together. And I said out loud - 'what a wonderful table' or something such.

It was my brother-in-law who looked at me confused and said 'O'. You know the way they say it like 'okay, I will just now look the other way so they don't realize they've completely lost it'-kinda-way ;).

THIS, unfortunately, was one of those projects where I tell the very much capable family members that it takes 30 minutes to saw the blanks and put them together, not a biggie AT ALL, I'll get the legs from Ikea. I think it took somewhere around 7 hours in total, during 3 days. Plus the work we, Weranna's girls (the other one is still young, so I can call us girls, right?), did scraping the table and doing the finishing. But the end result...LOVE. If you wish to get the same look, use a matt finish lacquer (suitable for dining tables!) and apply 2-3 layers so you can without worry keep the table clean!

It was fantastic to see some other ideas in the latest Deko. magazine from Finland - Using a glass on top doesn't work for our family just yet, but perhaps in 15 years or so, as it looks wonderful!

Home of interior designer Mikko Toppala and Riku Pousi, Finland

Home of AD Marja Tyni, Finland
***
Tee-se-itse pöytä, Ikea pöydänjalat

Wednesday, January 30, 2013

Yes, we all have our challenges


If I would rate this challenge in my life from 4-10, it would end up somewhere around 4,5. Max. But when the date for a show opening is coming closer and closer, you kinda get stressed. How do I write Weranna's Warehouse, and all the brands we represent on the wall? It is a bit embarrassing if they are not written there. And if they are just 'written' there, that's...well...boring.

I could've just used some agency to plan this for me. But I didn't want to. When you have in your mind, that this will be a DIY stand, then it really will be one.

So I would drive by this pallet beside our drive way every day - it came under some On Interior lanterns in November, and have been 'weathering' (perfect word ;)) there ever since. And one day I drove by, probably again thinking how to solve this, and thought - okay! We will just simply lift that one on the wall!! Dried it in sauna while I went through hours of letter adjustment, printing and cutting of the stencils at the kitchen table while chatting with my 6-year-old...until it was time to actually use the stencils.

Okay, okay okay...if it goes wrong, I'll just need to paint the whole thing white and do the letters with blue...okay, okay, okay....but it didn't! Only the stencils were a 1-timer (you see them on the upper corner all rolled up and destroyed), but hopefully my pallet will last for some time...


With Weranna's logo it all started of the image in my head that the letters need to come out of the wall. A perfect solution would've been to get them made of clay (perhaps next year?), or cut out of wood. But as life has been a bit on the windy side lately (or a hurricane would probably be the better describing word, I'll perhaps write a book about the past 4 months at some point ;)), it just didn't happen. So what did happen?

Old cardboard boxes. Adjusting letter sizes and printing them. Cutting them out. Spray painting them white (AND some branches). The plastic underneath is quite fab, as well. Perhaps it will be used for the Halloween party of Weranna's or something ;).

And this, my friends, was the most time consuming part of the whole stand preparation. I look at them now, and I am very, very happy. Like with anything you've done with your own hands :).

***
messuosasto, messuosaston rakentaminen, logo, erilainen logo, messuosaston logo


Sunday, January 27, 2013

Building a DIY fair stand...


...is a lot of work. And not, as it is so much fun :)! I thought somewhere there during the process that I could actually, instead of an interior designer, become an 'interior realizer'. Why? Because I've always enjoyed the physical side of the work.

I also loved the images that were flashing through my mind during the sleepless nights before and after Christmas (after I was crazy enough to say 'YES' to the offer from FORMEX to double our space as someone had cancelled at the last minute. DON'T accept, is my advice, unless you are completely crazy like me ;)). Extremely talented Paulina Arcklin had made excellent plans for Weranna's how it will all work out with 4 brands to present at the initial stand, but...yes, well, when plans change...

Luckily I love the planning, who doesn't? Which structures, which materials, which colors? How to build the contrasts between Weranna's products with soft forms and the surroundings? How to bring up the textures of the hand-made beauties in the most flattering way?


I loved the preparation (which required the not-so-smart trailer trips to the local market with slippery ground and 2 petite ladies loading wood and keeping the lid of the trailer up and ..... well, it all ended without anyone injured, those small wonders in life). The carrying (lot's of it), the painting (I thought of it more as biceps and triceps exercise) and all that.


I loved the building of the stand. It took us all in all about 20 hours.

I hated tearing it down. It took 4 hours. Almost precisely. And left me with a 3-day hangover, or at least so it felt ;).

The most challenging, time consuming part? More about that in the next post :).
***
messuosasto, messuosaston rakennus


Sunday, December 30, 2012

Snowy in the summer kitchen


We've finally made a decision. It has taken couple of years, and this is now the perfect compromise - we both get what we want. This is about our summerhouse - he will get to add another layer of insulation, which will mean covering the beautiful logs from the outside, and I will get to paint the logs white from the inside. And oil the floor grey.

Don't know what to do with the yellowish (majorly ugly) pine doors, but it'll come.


Don't you agree that white and grey together with small black details are the perfect colors for a summer house? With a bit of wood? Because then you can just add whatever color, when you feel like it, without any investments.

I stuck today some cones into the little plates that hang in our summer kitchen - isn't it pretty ;)? My new favorite thing -  to take photos with clean (and untouched here in the wilderness) snow as background - never really quite understood how white snow can be...


Saturday, December 29, 2012

Recycling flowers

DIY recycled flower arrangement

My husband turned 40 (goodness...) just before Christmas. And with that, he got a fair amount of BEAUTIFUL flower arrangements. One of them came with the sponge thingy, you know the one where you stick the flowers into when you make the arrangements?

It was made of red and white tulips, and green leaves, and was stunning until the tulips got tired. The sponge thingy had to be reused, OF COURSE, and the green leaves were also still in perfect shape. We also had some ivy in the garage, only half of the branches dead (I saved the pots from under the snow, and they didn't crack this year!!!). And from previous years - some small cones and dried mandarin slices in the Christmas decoration box. Some white flowers from the grocery store - and 15 minutes later I was quite happy with the result.  What do you think?

DIY recycled flower arrangement

I've had this hobby for some years, and I absolutely have no talent in it, but I just enjoy the end result at the dinner table :), as I don't enjoy peeking to the other side of the table through high flower bushes. Some photos of previous projects you can find here:

http://werannas.blogspot.fi/2012/07/birch-tree-wreath-turned-crayfish-party.html

http://werannas.blogspot.fi/2011/06/flower-garlands.html

DIY recycled flower arrangement

***
kukka-asetelma, matala kukka-asetelma